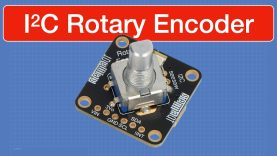
I2C Rotary Encoder
Let’s build an Etch-a-Sketch and a Menu System with Adafruit’s SeeSaw I2C Rotary Encoder!
Article with code: https://dronebotworkshop.com/i2c-rotary-encoders/
More articles and tutorials: https://dronebotworkshop.com
Join the conversation on the forum: https://forum.dronebotworkshop.com
Subscribe to the newsletter and stay in touch: https://dronebotworkshop.com/subscribe/
Rotary Encoders are really awesome controls, but conventional ones can be tricky to work with (especially if you have more than one). Enter Adafruit’s SeeSaw I2C Rotary Encoder, an easy-to-use encoder module with an I2C interface. Using I2C makes it easy to hook up one, two, or even eight encoders to your microcontroller with just a few wires.
These encoders include a pushbutton switch (most encoders do) and a built-in Neopixel RGB LED (not too many encoders have that). The Adafruit “Seesaw” Library makes it really easy to include these little gems in your project.
Today, we will see how these encoders work and run some test code to demonstrate their features. Then we will build two projects.
Our first project will be a menu system that allows you to control the Color and “Blink Pattern” of a Neopixel LED. You can use this as an example of building your own menu system.
The second project is a modern adaptation of the popular Etch-a-Sketch toy. It works much like the original, except you press a button instead of shaking it upside down to erase. It even allows you to change the line color and width, which you couldn’t do on the older Etch-a-Sketch.
Here is the Table of Contents for todays video:
00:00 – Introduction
01:26 – Adafruit Seesaw I2C Encoder
05:15 – Using the I2C Encoder
17:07 – Building a Menu System
27:41 – Build an Etch-a-Sketch
35:43 – Conclusion
After using these wonderful little encoders, you won’t want to go back to the older style! I hope you enjoy the video.
Bill
source

You might be interested in